Hey all, just finished another quilt and wanted to show it off. This is a baby quilt for yet another person we know who is expecting. I like doing baby quilts because they're small and relatively quick. It also gives you a chance to try out new techniques without getting too deep into it. I've wanted to do these stars for awhile and it just so happens that my Go Baby has the dies needed to do them.
I actually think it looks better in person. I'm not sure why but in pictures, it looks like it has way more white space.
In other news, I used Sheldon to sleep with for the first time last night as my normal quilt is in the wash. You will be happy to hear that he is nice and warm. The interfacing softened up a fair amount making it fluffier than it had been. A couple more washes and it should be perfect.
Coming Soon: a new project that you will all be very excited about (or not, I don't know!). Just working through the fabrics to be used, etc. This one could be epic.
Tuesday, 12 March 2013
Wednesday, 6 February 2013
Make your own Sheldon!
Hi all! I've had a lot of questions about how I made my Sheldon Cooper quilt so I wanted to share my process. I'm not saying this is the best way to do it, but it worked for me (I have noted where I would make changes to my process).
First, I made the pattern using the above photo and myphotostitch.com. This is a cross stitch pattern maker but it works pretty well for a quilt pattern as well. You will have to play with the settings a little bit to get the image you want. Once I had my pattern, I purchased my Kona colors that roughly match the suggested thread colors.
So then, I basically followed Sew Mama Sew's instructions for how to "quick-piece tiny squares" Here's the link to that. My photo above will show you how I did it differently - I drew the grid directly on the interfacing which came in 8.5x11 sheets. Next time, I would definitely buy a pre-gridded interfacing that came in metres as this became quite expensive. This is supposed to be wash-away interfacing but I haven't tested that theory yet. After you go through all of those steps outlined by SMS, you will end up with something like this:
And then, once quilted and bound should turn into something like this:
You can then show off your handiwork to anyone who cares to listen. Honestly, the quilting was the worst part of this and I felt like I had to fight with it the whole time. I think partly this is due to the fact that this was the largest quilt I tried to finish on my modest little machine but also I think the interfacing I chose was to blame. It was much stiffer than expected but hopefully it will be a lot better once it's washed once or twice. I started cutting pieces for this quilt in July and finished the whole thing in January. That's a long time! I've learned a lot though and I'm sure the next one will be much faster - especially now that I have my Go! Baby cutter!
I'd love to see what you decide to make with this mini-tute. Please pass along a pic! And if anyone knows someone at CBS, I think this would look really good on TV!
First, I made the pattern using the above photo and myphotostitch.com. This is a cross stitch pattern maker but it works pretty well for a quilt pattern as well. You will have to play with the settings a little bit to get the image you want. Once I had my pattern, I purchased my Kona colors that roughly match the suggested thread colors.
| Here are my squares all cut up. In the end, I had about 7500 1.5x1.5" squares. |
And then, once quilted and bound should turn into something like this:
You can then show off your handiwork to anyone who cares to listen. Honestly, the quilting was the worst part of this and I felt like I had to fight with it the whole time. I think partly this is due to the fact that this was the largest quilt I tried to finish on my modest little machine but also I think the interfacing I chose was to blame. It was much stiffer than expected but hopefully it will be a lot better once it's washed once or twice. I started cutting pieces for this quilt in July and finished the whole thing in January. That's a long time! I've learned a lot though and I'm sure the next one will be much faster - especially now that I have my Go! Baby cutter!
I'd love to see what you decide to make with this mini-tute. Please pass along a pic! And if anyone knows someone at CBS, I think this would look really good on TV!
Monday, 7 January 2013
Seussical
I keep looking at the word "seussical" and it loses it's meaning (of which it had very little to begin with). However, I think it's the best word to describe the baby quilt that I just finished. I have to admit this was a quickie since we only just realized that the parents' due date was coming up soon and then they had the nerve to have the baby early! Obv they didn't think of me! Anyway, enough selfishness, here are the pics. The front is a big panel with all of the words to the Cat in The Hat book. I just put the borders around it. The back is one big piece of fabric with other pics from the book. I think it's super cute but it feels a bit like cheating.
The quilting was done following the red stripes between the mini panels which you can see in this photo. I also finally got quilt tags done up so you can see the first one attached here. It looks a bit jenky (eric's word) because I had to attach it by hand after the quilt was done since they only just arrived. Normally, I would machine sew it onto the back before I quilted it but I wasn't able to this time.
Here's another Sheldon update. He took a little break while I was working on the seuss quilt but now he's back at the top of the WIP (work-in-progress) pile. Hoping to finish up the top in the next couple of weeks and then I'll have to decide what to put on the back. I'm thinking I might do a quote but haven't decided.
The quilting was done following the red stripes between the mini panels which you can see in this photo. I also finally got quilt tags done up so you can see the first one attached here. It looks a bit jenky (eric's word) because I had to attach it by hand after the quilt was done since they only just arrived. Normally, I would machine sew it onto the back before I quilted it but I wasn't able to this time.
Here's another Sheldon update. He took a little break while I was working on the seuss quilt but now he's back at the top of the WIP (work-in-progress) pile. Hoping to finish up the top in the next couple of weeks and then I'll have to decide what to put on the back. I'm thinking I might do a quote but haven't decided.
Friday, 4 January 2013
Prezzies!
Hi all! Hope you had a fantastic Christmas. I wanted to share with you a couple of the items that have made an appearance in my house over the break. My darling husband got me a new 40" TV for the living room upstairs. I previously had an old tube tv that was my Grandmothers. It was a great TV for what I used it for but it made weird noises when it turned on and sometimes a high pitched noise at random. Time for it to go! So now I have a lovely new Samsung with AppleTV which will be awesome as soon as I figure out how to use it for more than Netflix.
My other big-ish gift was from my MIL with some accessories from Eric. This is the Go Baby fabric cutter by Accuquilt. I've wanted one for quite a while because I'm terrible at cutting straight lines. I think this will really make quilting more enjoyable for me. Basically what you do is sandwich the fabric between a die (the green piece you see above) and the cutting mat (the white piece you see on top of the fabric above) and roll the whole thing through the machine using the turn crank. You can get all kinds of different dies but I just went with the 2.5" strip cutter and one multipurpose one that has squares and triangles. I think you can put up to 8 layers of fabric in there but I imagine the cuts would be less perfect the more you put in. Haven't had a lot of chances to play with this puppy but am very excited to really test it out.
The last item I wanted to tell you about is an awesome calendar that we picked up when we were in Boston in September. Above is the Jan picture. All of the months are super bright and colorful. Just the thing to put some excitement into a dull kitchen (although our kitchen is bright yellow so it's not really dull to begin with). The BEST part about this calendar is that the back of each page has a template for a different item. You can cut apart the pages and make pillow boxes, square boxes and notecards. Since I am an accountant I will more likely be using the file folder template the most. There's nothing more fun to jazz up some boring files! I love the idea of reusing the pictures since every year I get a beautiful calendar and feel terrible about throwing it out when it's used. If you want to get one for yourself, you can get it from paper-source.com.
What'd you get for Christmas?
My other big-ish gift was from my MIL with some accessories from Eric. This is the Go Baby fabric cutter by Accuquilt. I've wanted one for quite a while because I'm terrible at cutting straight lines. I think this will really make quilting more enjoyable for me. Basically what you do is sandwich the fabric between a die (the green piece you see above) and the cutting mat (the white piece you see on top of the fabric above) and roll the whole thing through the machine using the turn crank. You can get all kinds of different dies but I just went with the 2.5" strip cutter and one multipurpose one that has squares and triangles. I think you can put up to 8 layers of fabric in there but I imagine the cuts would be less perfect the more you put in. Haven't had a lot of chances to play with this puppy but am very excited to really test it out.
The last item I wanted to tell you about is an awesome calendar that we picked up when we were in Boston in September. Above is the Jan picture. All of the months are super bright and colorful. Just the thing to put some excitement into a dull kitchen (although our kitchen is bright yellow so it's not really dull to begin with). The BEST part about this calendar is that the back of each page has a template for a different item. You can cut apart the pages and make pillow boxes, square boxes and notecards. Since I am an accountant I will more likely be using the file folder template the most. There's nothing more fun to jazz up some boring files! I love the idea of reusing the pictures since every year I get a beautiful calendar and feel terrible about throwing it out when it's used. If you want to get one for yourself, you can get it from paper-source.com.
What'd you get for Christmas?
Monday, 17 December 2012
Mixed Bag
Hi All,it's been awhile but I have been so busy with other things that I don't have much of an update on the secret project. Here's the most recent pic. Hopefully there will be some time to work on it more over the holidays so I can get you a better update. I'm actually really impressed at how great it's looking (if I do say so myself). Please excuse the surroundings as the spare bed often acts as storage for Dartmouth Clothing stuff as well.
I have been doing a bit of shopping on the fabric sites over the past month or so. Here are some of the items I've been looking at:
![]() |
| Henna Garden. One of my fave fabric lines. This stuff is out of print so when I saw this bundle on Etsy, I had to get it. |
This next line is called Winterkist by Monica Soloria-Snow. Perfect non-christmas Christmas fabric. I haven't bought it yet but it's on the list for sure! I just can't decide which colors. If she keeps going with fabrics like this, she might be on my list for favorite designer.
![]() |
| Roughing it by Laurie Wisbrun. She is one of my favorite designers and this one is super cute. I'm picturing it on a quilt for a little boy or even just one to keep at the cottage. |
![]() |
| Wisbrun's sequel to the Llamas in sweaters I blogged about awhile back. This is the Christmas edition. |
Thursday, 1 November 2012
Halloween Wrapup
Hi folks. Since I'm still waiting on Amazon to send me some items I need to continue my work on the Secret Quilt (What the hell does "shipping soon" mean??), I thought I would give you a wrap up of our halloween costumes.
First up is Eric's costume. He went as an alien from the movie "Attack the Block". Apparently it's a good movie although I haven't seen it. The alien is described as "all teeth and fur" so I understand if you can't tell what it is.
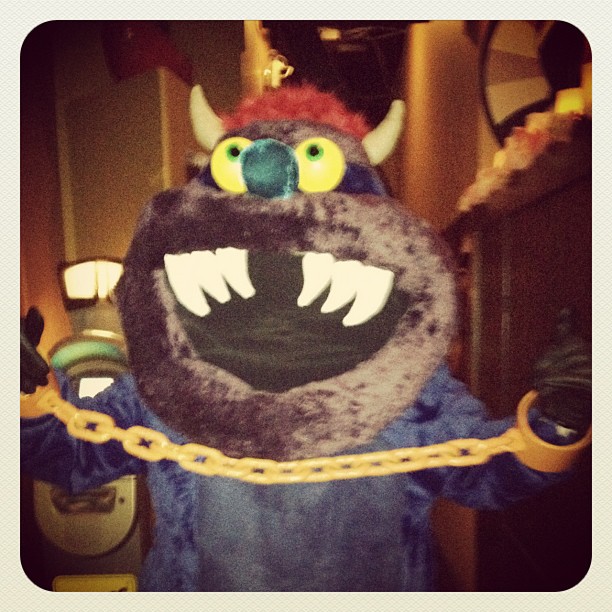
Next up is my costume. I'm a fan of retro pop culture for costumes so I went as My Pet Monster. If you're in the 30 year old area, you probably know what I'm talking about. If not, the show is on Teletoon Retro.
Finally, is my nephew's costume. He wanted to be Sonic the Hedgehog - a video game character that is both classic and contemporary. A good choice and he was quite the star at his school!
Sorry for the terrible quality of pics. Hope you enjoyed Halloween as much as we did!
First up is Eric's costume. He went as an alien from the movie "Attack the Block". Apparently it's a good movie although I haven't seen it. The alien is described as "all teeth and fur" so I understand if you can't tell what it is.
![]() |
| Eric's Costume |
![]() |
| Screenshot from the movie |
Finally, is my nephew's costume. He wanted to be Sonic the Hedgehog - a video game character that is both classic and contemporary. A good choice and he was quite the star at his school!
Sorry for the terrible quality of pics. Hope you enjoyed Halloween as much as we did!
Friday, 19 October 2012
Sneak Peek
Alright ladies and gentlemen (who am I kidding, it's just ladies!). I know you've all been chomping at the bit to get a glimpse of the secret project. Well, here it is. I'd say it's about 1/3 done as I have roughly 2500 squares pieced. My original estimate was 10,000 pixels but I cut off a substantial amount of the original picture to make it more manageable. Final will be closer to 7,000 pixels but it will still be plenty large. Note that the finished size of each pixel is about 1" square and you can understand what a big project this is. Would love to hear your guesses as to what you think it is!
Subscribe to:
Posts (Atom)